Home » Paving
Category Archives: Paving
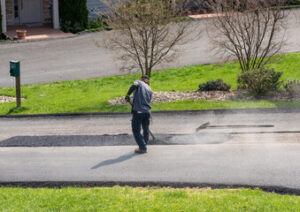
Sealcoating Your Blacktop Driveway
Sealcoating is a popular way to keep blacktop driveways, parking lots, and roads in good condition. It helps prevent cracks from repairing themselves and keeps water out.
The conditions have to be suitable for seal coating. If rain is expected within 24 hours, workers must postpone the project. To learn more, visit https://www.rochesternysealcoating.com/.
Workers use squeegees or sprayers to apply the seal coat. It’s important to know how different methods work to make sure the pavement gets evenly covered.
Sealcoating is a special mixture applied to asphalt surfaces to protect them. It’s like a little jacket for your driveway or parking lot, protecting the surface from further damage and extending its lifespan.
It is a process that requires specialized equipment and training to be performed correctly. It can be very dangerous for the workers, especially if the chemicals used are carcinogenic. Workers need to wear protective clothing, including face masks and goggles. They need to ensure that vehicles are removed from the area and that pedestrians are kept away for 24 hours after application.
The ingredients in seal coats vary, but they typically include an asphalt binder (like bitumen or coal tar) and other materials such as fine sand and rubber additives. Some may also contain UV protection and anti-oxidation agents. The asphalt binder is what holds the pavement together, but it is prone to degradation by weather elements such as rain and UV rays. Protecting the pavement with a layer of seal coat helps to delay this process and keep it from becoming brittle.
To make the best seal coats, it is important to use high-quality raw materials. The sand should be clean and free of impurities such as gravel or pebbles. Using the right grade of sand is also important to get the best results. The sand should be of a size that allows it to be firmly anchored in the cured seal coat film. This will help to give the resulting surface its traction and texture.
A professional contractor will have the tools and equipment to perform this task quickly and accurately. It can save you money by avoiding the need for costly repairs or resurfacing.
It is recommended that you have your driveway or parking lot seal coated every few years, depending on its age and location. Seal coating is not cheap, but it can extend the life of your pavement and prevent it from premature deterioration. This can save you a lot of money in the long run, making the minor labor cost worth it. For commercial properties, this is even more important as a poor-quality pavement can lead to customer complaints and loss of business.
Preparation
Asphalt pavement is a mixture of rock and stone and gravel held together with an oil-based binder. When this binding agent degrades, your asphalt becomes brittle and more susceptible to damage. Regular sealcoating helps to prolong the life of your asphalt surface, protecting it from rain, UV rays and chemicals.
To get the best results from your sealcoating, it’s important that all repairs are complete and the blacktop is clean prior to application. This includes patching all cracks, filling all potholes and removing any grass or vegetation that is growing in the blacktop. If weeds or vegetation are allowed to grow, they will eventually grow into and through the asphalt, damaging it.
It’s also a good idea to sweep the pavement before the sealing process begins to remove any loose debris and dirt. Once the area is swept, it should be blown dry with a blower to eliminate any moisture that may prevent the sealcoat from adhering properly to the asphalt.
Once the surface is ready, your contractor will block off the designated area in which you would like to have the sealcoating applied. This will prevent customers, suppliers and anyone else from accessing the area during the process. If you operate a commercial parking lot, it’s best to communicate with your suppliers and clients ahead of time to let them know that the parking lot will be inaccessible for several hours while the sealcoating is applied.
Your contractor will then move to set up a work station on one side of the paved area, where they will be mixing the sealer and applying it to the paved surface with squeegees or sprayers. Typically, two coats of the sealer will be applied, and the entire area will need to be dried for 24 to 48 hours before vehicles can be driven on it again.
You’ll want to make sure that your asphalt is well protected from the elements while it’s drying, so a good quality tarp should be placed over the area. It’s also a good idea to shut off your sprinkler system, and ensure that it stays off until the area is fully cured.
Application
The asphalt paving process includes not only laying down new surfaces, but also filling in cracks and chips, repairing major asphalt damage, and resurfacing an existing surface. Sealcoating is a protective layer that is applied over the top of an asphalt surface to prevent damage from harsh weather, chemicals, water, oils, and vehicular harm. A regularly scheduled program of sealcoating can greatly extend the life of a paved surface.
To prepare for a sealcoat job, workers should remove any vehicles from the area being worked on and block off pedestrian and vehicular traffic with cones and/or barricades. Workers will then use a power broom to loosen the old coat of asphalt and remove any debris that might be stuck in the cracks or holes. It is important that the asphalt is swept clean prior to sealcoating because any dirt or sand in the mix can cause the new coating not to bond properly.
Once the surface is swept, workers will apply a bonding primer to help ensure that the new coating will adhere well. Once the primer has cured, the crew will apply two coats of sealant using either the spray or squeegee method. Both methods have their advantages, but the spray application is much faster and allows the crew to cover a lot of ground in a short amount of time. It also helps to achieve a more uniform finish than the squeegee method.
During the sealcoat application, it is important that the temperature is between 50 and 85 degrees Fahrenheit. If it is too hot or cold, the coating will not adhere to the pavement. The crew must let each coat dry for between 24 and 48 hours. It is also crucial that the area being sealcoated be free from rain and dew for the same duration.
The four main ingredients of any sealcoat are bitumen (a petroleum-based liquid), sand, water, and chemical additives. Some sealcoats will contain additional ingredients such as a tackifier to help it adhere to the pavement and reduce any cracking. It is also common to find sealcoats that have been infused with rubber or plastic polymers to improve flexibility and add color. Refined coal tar is often used as a sealcoat binder but has been criticized because it contributes to higher levels of polycyclic aromatic hydrocarbons in streams and other waterways.
Maintenance
Sealcoating is a preventative maintenance step that extends the life of asphalt paving. It protects the surface from the elements that cause damage such as UV rays, rain and snow, oil, gasoline and other chemicals. It also prevents cracks from getting larger and helps to fill small holes.
In addition, it provides a clean and attractive look for the asphalt surface. Sealcoating is a low-cost option for extending the lifespan of asphalt surfaces, and it can help to avoid more costly repairs and resurfacing jobs in the future.
The longevity of a sealcoat depends on many factors including weather conditions, the amount and type of traffic and how well the original application was performed. However, a sealcoat that is properly maintained can last from two to five years.
It is essential that asphalt is in good condition before applying a sealcoat. Professional pavement contractors will ensure the area to be sealed is free from dirt, debris, ruts and potholes. Linear cracks will be blown out using blowers and then filled with hot rubberized crack filling material to prevent moisture from worsening the cracks.
Proper cleaning and maintenance of asphalt after the sealcoat is applied is another important factor in extending its lifespan. Sweeping and pressure washing removes accumulated materials such as sand and oil stains that can erode the sealcoat over time.
Workers need to use proper personal protective equipment when working with the sealcoat and associated equipment. This includes boots, coveralls, face masks and gloves. These materials contain toxic chemicals that, if inhaled or ingested, can cause cancer and other serious health problems.
It is also important that the area is allowed to completely cure before allowing heavy vehicles to drive over it. This typically takes a day or more depending on the weather conditions and humidity levels.
Parking Lot Resurfacing
A parking lot that’s in disrepair gives customers a wrong first impression about your business. It also poses a safety hazard for drivers whose vehicles are damaged by potholes and other uneven surfaces.
Parking Lot Resurfacing adds a new layer of asphalt over your current blacktop, often followed by seal coating. It’s a cost-effective way to improve the appearance of your parking lot.
Before the resurfacing process can begin, it is important to carefully inspect the parking lot for any significant damage. Cracks and rutting are two of the most common issues that require immediate attention to prevent further deterioration and costly repairs. In addition, weeds and debris must be removed to create an even surface for the new asphalt.
Once the parking lot has been inspected, the first step in preparation is to clear away any debris and weeds that have grown in the cracks of the pavement. This helps to ensure that the new asphalt will adhere properly and extend the lifespan of the surface.
Next, the surface should be cleaned to remove any dirt or oil that has accumulated on the parking lot over time. During this stage, it is also important to repair any minor cracks or rutting that may be present.
The resurfacing material used for the parking lot should be mixed according to manufacturer guidelines. The mixture must be uniform to ensure a smooth application and a durable finish. To achieve the proper consistency, a paddle mixer is recommended as opposed to barrel-type mixers that don’t provide a consistent mix.
In addition to resurfacing, it is also a good idea to have the parking lot sealcoated. This will help to protect the new asphalt from weather elements and harmful chemicals such as salt, water, gasoline, and oils that are often found on vehicles.
If you’re interested in repairing your asphalt parking lot and extending its life, contact us for more information about resurfacing and resealing services. Our team of experts will be able to assess your parking lot’s condition and determine which service is right for you.
After the resurfacing is completed, it is crucial to allow enough time for the asphalt to cure before allowing traffic on it. This process can take up to 48 hours, depending on the temperature and weather conditions. During this period, it is important to keep the area free from any disturbances or traffic so that the newly resurfaced parking lot can gain strength and durability.
Materials
The material used for resurfacing a parking lot can have a significant impact on the overall quality of the finished product. The resurfacing material needs to be mixed properly to achieve a smooth and uniform application that will last for years. This is why it is important to use a professional contractor for resurfacing your commercial or residential property’s asphalt pavement.
Depending on the location of your property and the type of parking lot you have, your contractor will use different asphalt resurfacing materials. The most common is hot mix asphalt, but a number of other options are available as well. The right choice will depend on your property’s unique needs, including the amount of traffic and the climate where you live or work.
Once the preparation is complete, your contractor will lay down an adhesive coat to ensure a clean bond with the existing asphalt surface. Next, the resurfacing material is applied in layers and rolled over with a roller. The final step is to apply water to help the new layer set up.
When done correctly, the resurfacing process will last for years and will greatly improve the look of your property’s parking lot. This will also save you money on future repairs.
Parking lots can be damaged by harsh weather conditions such as freeze-thaw cycles, deicing salts and vehicle fluid stains that cause surface scaling. If left unattended, these problems can lead to large cracks and potholes that damage vehicles, cause accidents and reduce your property’s curb appeal.
In addition to resurfacing, your contractor can also use this opportunity to perform minor maintenance tasks such as repairing small cracks and filling in potholes. It is also a good time to consider resealing the surface of your parking lot. This preventative maintenance task can significantly extend the lifespan of your asphalt by protecting it from oil, gasoline, salt, chemicals and UV rays. It also helps slow oxidation and makes the lot easier to clean. It is recommended to reseal your parking lot every 2 to 3 years. If you skip this step, your parking lot will deteriorate quickly and require much more expensive repair work in the future.
Installation
Resurfacing involves applying a new layer of blacktop over the existing asphalt surface. It is usually performed for aesthetic reasons, but it also improves the surface’s lifespan and maintains its durability. This helps you avoid the costly expense of replacing your entire parking lot.
Before resurfacing, any existing cracks and other repairs must be made. This is essential to ensuring that the final result of your parking lot resurfacing project is a smooth and even surface. It also prevents moisture from penetrating the existing cracks, which can further damage the parking lot. In addition, any sunken areas or ruts must be filled and leveled prior to resurfacing. This not only improves the appearance of the parking lot, but it can prevent accidents and injuries caused by uneven surfaces.
In preparation for resurfacing, the existing asphalt surface must be cleaned thoroughly. Any debris must be removed and the drainage system must be checked for proper functionality. The surface must be free from any loose or raised areas and all joints must be properly sealed. If the surface isn’t properly prepared, the resurfacing process can be more expensive and may not last as long as it should.
Once the surface is ready, large aggregates are spread over the parking lot to create a base layer that will provide strength and structure to the final asphalt surface. This layer is then covered by a layer of smaller aggregate and oil. Once this is applied, it is rolled with a heavy roller to ensure a smooth finish. Transitions and butt joints are then added for smooth transitions between different areas of the parking lot. Finally, the entire parking lot is rolled again with a heavy roller to yield a smooth, like-new asphalt surface.
Resurfacing only covers the top surface of the existing asphalt, so it won’t fix any underlying issues or serious problems. If your parking lot has severe cracks, potholes, or is a safety hazard for pedestrians and vehicles, it’s time to consider repaving the entire area.
A professional can assess your parking lot and help you determine if resurfacing or repaving is the best option for you. A well-qualified contractor will be able to give you an accurate quote and timeline, so you can plan accordingly.
Maintenance
Performing regular parking lot maintenance is essential for the longevity of your asphalt or concrete surfaces. This includes crack filling, resealing, and grinding as needed. Regular inspections also allow you to spot problems and address them before they become major issues that require costly repairs or even replacement.
Resurfacing a parking lot involves applying a new layer of asphalt to an existing surface. This process helps to give the parking lot a fresh new look and improves curb appeal. However, before resurfacing begins, the existing surface must be cleaned and prepped. It is important to remove any structures such as concrete speed bumps or wheelchair ramps. In addition, any structures for utility companies’ pipes or wires must be removed or demolished. This ensures that the asphalt is properly installed.
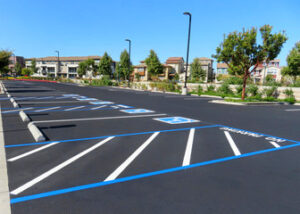
Once the resurfacing material is applied, it takes several days to dry and cure. During this time, the parking lot should be closed to all vehicles. This will help to ensure the safety of all the guests, and it will also prevent damage to the newly resurfaced area. Once the resurfacing material has had time to fully cure, it is important to stripe the parking lots for functionality and compliance with ADA standards. This can be completed using durable paint that is designed for use on pavement, and it will make it easier for drivers to navigate the parking lot and find their vehicle.
It is critical to have proper drainage in your parking lot to avoid water damage and extend its lifespan. A professional can install or repair an effective drainage system to minimize the risk of water pooling on the lot and damaging the surface.
Depending on the age and condition of your parking lot, resurfacing may be a good option for you. However, if there is significant structural damage to the asphalt or concrete, it may be more cost-effective to remove and reconstruct the lot.
The condition of your parking lot has a big impact on the impression visitors have of your business or property, and it is crucial to keep up with routine maintenance to prevent major problems down the road. A parking lot that is in disrepair can turn away potential customers or tenants who may be concerned about the safety of their cars and the quality of your service.